Savanna Edge-to-Cloud: Chameleon Cloud + Edge

In this tutorial, we show how to analyze the performance of a real-life Edge-to-Cloud application deployed in the African savanna (illustrated in Figure 1: Edge-to-Cloud application).
This application is composed of distributed Edge devices monitoring animal migration in the Serengeti region. Devices at the Edge collect and compress wildlife images, then the image is sent to the Cloud where the animal classification happens using a pre-trained Neural Network model. Finally, classified data helps conservationists to learn what management strategies work best to protect species.
The goals of these experiments are to understand the impact on performance of Cloud-centric and Hybrid (Edge+Cloud) processing approaches.
In this example you will learn how to:
Configure a cloud service on Chameleon Cloud testbed (animal classification using Deep Learning)
Configure an edge device on Chameleon Edge testbed (collect and compress wildlife images, then send images to the cloud service)
Configure the network between the edge device and cloud service.
Execute experiments and analyze results
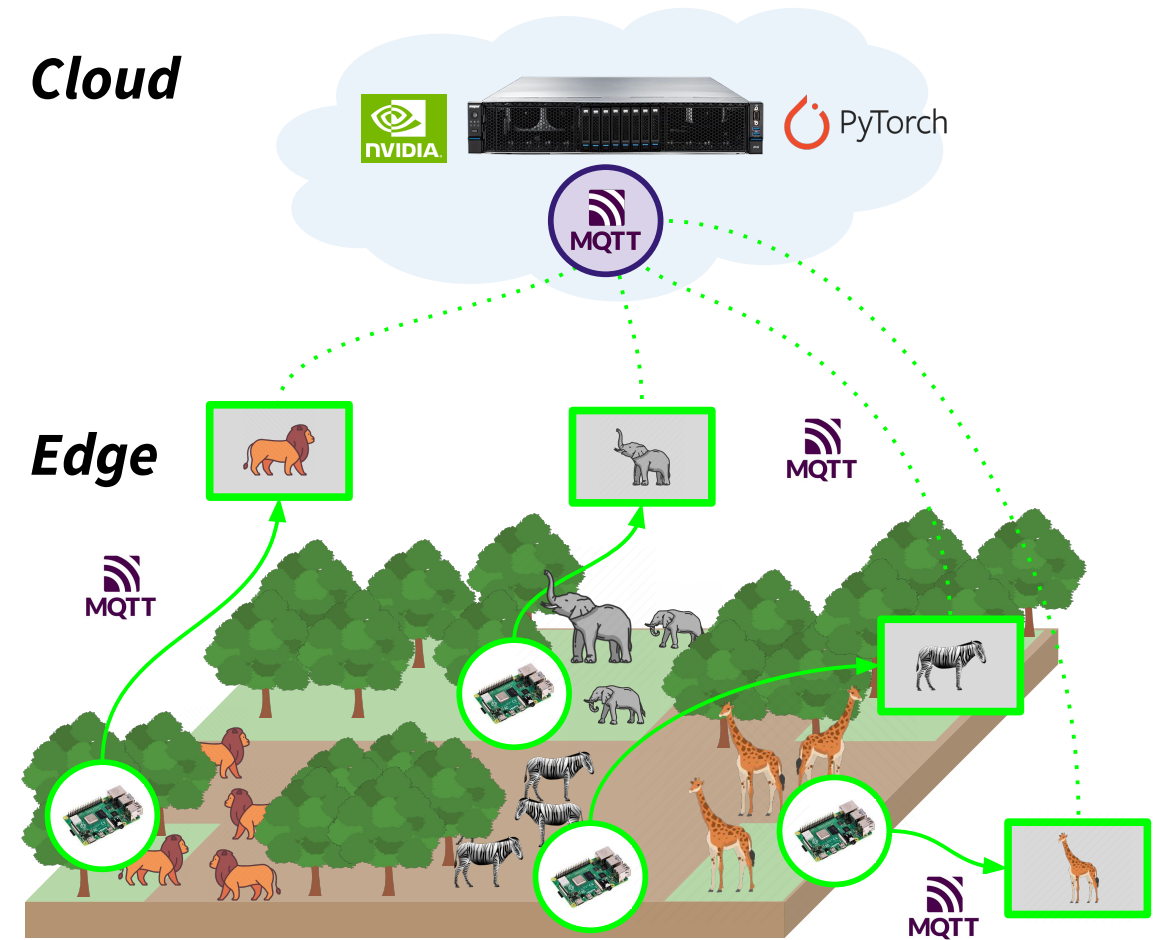
Fig. 19 Figure 1: Edge-to-Cloud application
Experiment Artifacts
$ cd ~/git/
$ git clone https://gitlab.inria.fr/E2Clab/examples/savanna
$ cd savanna/
$ ls
artifacts          # contains artifacts for the cloud server and the edge device
chameleon          # contains layers_services.yaml, network.yaml, and workflow.yaml
Defining the Experimental Environment
Layers & Services Configuration
This configuration file presents the layers and services that compose this example.
The Cloud Server (one machine quantity: 1 in Chameleon Cloud environment: chameleoncloud).
The Edge Client (one Raspberry Pi 3 quantity: 1 in Chameleon Edge environment: chameleonedge).
 1---
 2environment:
 3  job_name: savanna-edge-cloud
 4  walltime: "07:59:00"
 5  chameleoncloud:
 6    key_name: "your_key"
 7    rc_file: "your_chameleon_rc.sh"
 8    image: CC-Ubuntu20.04
 9  chameleonedge:
10    rc_file: "your_chameleon_rc.sh"
11monitoring:
12  type: tig
13  network: shared
14  provider: chameleoncloud
15  cluster: compute_skylake
16layers:
17- name: cloud
18  services:
19  - name: Server
20    environment: chameleoncloud
21    cluster: compute_skylake
22    roles: [monitoring]
23    quantity: 1
24- name: edge
25  services:
26  - name: Client
27    environment: chameleonedge
28    servers: iot-jetson06
29    containers:
30    - name: cli-container
31      image: ubuntu
Note
In layers_services.yaml, provide the path to your application credentials for each
Chameleon site in rc_file and your key name in key_name.
Network Configuration
The file below presents the network configuration between the cloud and edge
infrastructures delay: 30ms, loss: 0.1%, rate: 512kbit.
1networks:
2- src: cloud
3  dst: edge
4  delay: 30ms
5  rate: 512kbit
6  loss: 0.1%
Workflow Configuration
This configuration file presents the application workflow configuration.
The Cloud Server
cloud.server.*:
prepare copies from the local machine to the remote machine the artifacts
launch executes the Python application (animal classification using Deep Learning)
finalize after experiment ends, copies the results from the remote to the local machine
The Edge Client
edge.client.*:
prepare copies from the local machine to the remote machine the artifacts
launch executes the client application (collect and compress wildlife images,
then send images to the cloud server)
 1# SERVER
 2- hosts: cloud.server.*
 3  prepare:
 4    - copy:
 5        src: "{{ working_dir }}/artifacts_cloud/"
 6        dest: /tmp
 7  launch:
 8    - debug:
 9        msg: "Running the server"
10    - shell: cd /tmp && bash cloud_worker.sh > cloud-log.log
11    - shell: python3 /tmp/predict_loop.py
12      # async: 3120
13      async: 60
14      poll: 0
15  finalize:
16    - debug:
17        msg: "Saving results"
18    - fetch:
19        src: /tmp/predict.log
20        dest: "{{ working_dir }}/experiment-results/"
21        validate_checksum: no
22# CLIENT
23- hosts: edge.client.*
24  depends_on:
25    - service_selector: cloud.server.*
26      grouping: "round_robin"
27      prefix: server
28  prepare:
29    - copy:
30        src: "{{ working_dir }}/artifacts_edge/"
31        dest: /
32  launch:
33    - debug:
34        msg: "Running the client"
35    # - shell: "bash /edge_worker.sh edge_data 100 {{ server.gateway }} True"
36    - shell: "touch /tmp/output.txt"
37  finalize:
38    - fetch:
39        src: /tmp/output.txt
40        dest: "{{ working_dir }}/experiment-results/"
Understanding the parameters of edge_worker.sh:
edge_data is the topic name
100 is the number of times the edge device will send images to the Cloud (every 30 seconds)
True means Edge+Cloud processing approach (False means Cloud-only processing approach)
Note
Using depends_on on the Edge Client edge.client.* we can access the public
IP address to reach the Cloud Server as follows {{ server.gateway }}.
Running & Verifying Experiment Execution
Find below the commands to deploy this application and check its execution.
$ e2clab deploy ~/git/savanna/chameleon/ ~/git/savanna/artifacts/
Note
For the first deployment, a good practice is to do it incrementally, as explained here.
ssh to the Cloud server
$ ssh cc@<public_ip>
cc@<public_ip>:~$ tail -f /tmp/predict.log
Note
You can find the public IP of the cloud server in the chameleon dashboard
You may also check the mosquitto topic
You can use the Python script at ~/git/savanna/artifacts/utils/mosquitto_sub_img.py to
download images received. Images will be downloaded in the directory you run the script.
In the example below, 192.5.87.127 is the IP address of the cloud server.
$ python mosquitto_sub_img.py --topic edge_data --mqtt_broker 192.5.87.127
Deployment Validation & Experiment Results
Find below the files generated after the execution of each experiment. It consists of:
validation files:
layers_services-validate.yaml,network-validate/, andworkflow-validate.outexperiment resutls: for each experiment a new directory is generated
20230623-150252/.
$ ls ~/git/savanna/chameleon/20230623-150252/

layers_services-validate.yaml   # Mapping between layers and services with physical machines
network-validate/               # Network configuration for each physical machine
workflow-validate.out           # Commands used to deploy application (prepare, launch, and finalize)
experiment-results/             # Experiment results
Plotting the results: you can use the
~/git/savanna/artifacts/utils/plot_processing-time.pyPython script to plot the results as in Figure 2: Cloud-centric vs Edge+Cloud processing. Update the script according to your needs.

Fig. 20 Figure 2: Cloud-centric vs Edge+Cloud processing