User-Defined Services
This section is intended to explain all you need to know about User-Defined Services. That means, how to implement, deploy, and manage your Services.
What is a User-Defined Service?
In E2Clab, a service represents an agent that provides a specific functionality or action in the scenario workflow. If you plan to deploy your application using E2Clab you have to implement a User-Defined Service. A User-Defined Service is an E2Clab Service implemented by users according to their needs. Users may use the EnOSlib library to implement their services.
Find in our repository a list of more than 10 Services already implemented. You can reuse them or build your own service inspired by the existing ones. These examples include:
master-worker based services
using Docker container images
services with subservices
Feel free to share your services in this repository, so others can reuse them!
How to implement a Service?
The steps to implement a service are:
Each service must be implemented in a “.py” file, e.g.:
MyService.py.The class name should be the same as the file and must inherit the Service class.
Implement the logic of your service in
deploy().Register your service using
register_service().
Next, we explain how to:
use the Service class to implement your service;
assign service’s hosts to subservices (e.g., master and workers);
run commands on hosts and access the service metadata;
assign extra information to services;
register your service;
The Service class
From the Service class, users may get access of the services’s metadata defined by
users in the layers_services.yaml file. Furthermore, users may generate service’s
extra information that may be accessed by other services in the workflow.yaml file.
Please, see Figure 1: Service dataflow.
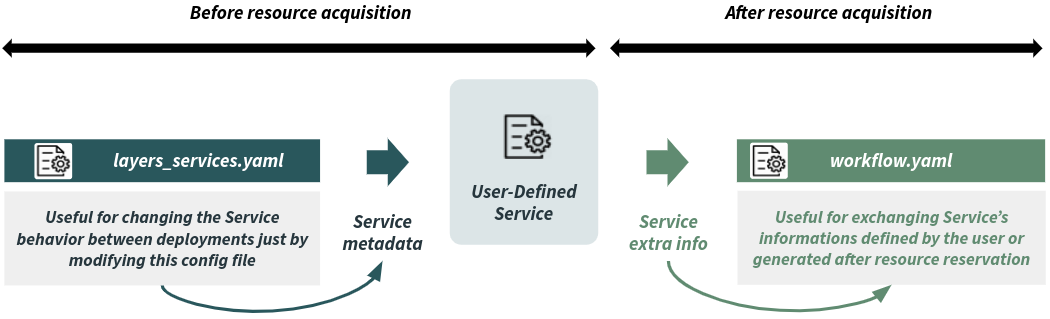
Figure 1: Service dataflow
The Service class provides two methods to implement a service, they are:
deploy(): where you should implement the logic of your service; andregister_service(): to register your service.
It also provides the following attributes:
self.hosts: all hosts (EnOSlib Host) assigned to the Service.self.layer_name: the Layer name that the Service belongs to (inlayers_services.yaml).self.roles: EnOSlib Roles grouping all hosts.self.service_metadata: the Service metadata defined by users inlayers_services.yamlfile.
Assigning service’s hosts to subservices
First host for the Master and the remaining ones for the Workers.
1roles_master = Roles({"master": [self.hosts[0]]})
2roles_worker = Roles({"worker": self.hosts[1:len(self.hosts)]})
Running commands on hosts & accessing the service metadata
EnOSlib uses Ansible to run
commands on hosts. In the example below, lines 4 and 6 use
run()
to run commands on the hosts. While, lines 12 and 13 use Ansible modules such as
shell
and docker_container,
respectively, to run commands on the host. Line 15 accesses the service metadata
defined by the user in the layers_services.yaml file.
 1 import enoslib as en
 2
 3 # Running a command in the Master host
 4 my_command_output = en.run("my command", roles=roles_master)[0].stdout
 5 # Using the output of the previous command as a command in the Worker hosts
 6 en.run(f"{my_command_output}", roles=roles_worker)
 7
 8 # Installing a package and then starting a container on the Master host.
 9 # The image name is obtained from the service metadata defined in
10 # 'layers_services.yaml' file.
11 with en.actions(roles=roles_master) as a:
12     a.shell("pip3 install ...")
13     a.docker_container(
14         name="master",
15         image=self.service_metadata["data_2"]["sub_data_1"],
16         ...
17     )
Please, find below other methods provided by EnOSlib to run commands on hosts:
run: to run commands;
run_command: to run shell commands with Ansible patterns;
run_play: to run Ansible tasks;
run_ansible: to run Ansible playbooks.
Assigning extra information to your service
1 workers = ['wk_id_1', 'wk_id_2', 'wk_id_3']
2 # adding in the Master information about Workers
3 extra_master = [{'container_name': "master", 'workers': workers}]
4 # adding information to the Workers. Each element in the list refers to a Worker.
5 extra_workers = [
6     {'key1': "value1", ..., 'keyN': "valueN"},  # 1st Worker
7     {'key1': "value1", ..., 'keyN': "valueN"},  # 2nd Worker
8     {'key1': "value1", ..., 'keyN': "valueN"},  # 3rd Worker
9 ]
Registering your service
 1 # Register the Service (this example consider a service with subservices)
 2 # 'Master' is a subservice of the 'MyService' service
 3 self.register_service(_roles=roles_master, sub_service="master",
 4                       service_port=8888, extra=extra_master)
 5
 6 # 'Worker' is a subservice of the 'MyService' service
 7 self.register_service(_roles=roles_worker, sub_service="worker", extra=extra_workers)
 8
 9 # service_extra_info: extra attributes assigned to the service. They can be accessed
10 # in the "workflow.yaml" file.
11 # service_roles: the registered services.
12 return self.service_extra_info, self.service_roles
Note
Besides the extra information defined by users, such as:
self.register_service(…, extra=extra_master)
self.register_service(…, extra=extra_workers)
E2Clab adds to all hosts in a service the following extra information:
_id: refers to the final Service ID: LayerID_ServiceID_MachineID__address__: refers to the hostnameurl: hostname:port or just hostname (if port number is not defined)__address4__: refers to the ipv4 address of the hosturl4: ipv4:port or just ipv4 (if port number is not defined)__address6__: (if applied) refers to the ipv6 address of the hosturl6: (if applied) ipv6:port or just ipv6 (if port number is not defined)
Therefore, after the Service registration, the whole extra information, of the master
service, will be:
_id: ‘1_1_1’,__address__: ‘10.52.0.9’,url: ‘10.52.0.9:8888’,__address4__: ‘10.52.0.9’,url4: ‘10.52.0.9:8888’,container_name: “master”,workers: [‘wk_id_1’, ‘wk_id_2’, ‘wk_id_3’]Once registered, E2Clab generates tags for each Service. The tags are generated as follows:
Service without subservices:
layer_name.service_name.service_id.host_id.Service with subservices:
layer_name.service_name.service_id.subservice_name.host_id.
Note
service_id starts from 1 (one) and is incremented per layer.
host_id starts from 1 (one) and is incremented with the number of hosts.
Please, see examples below:
Considering a one Service named MyService composed by four hosts deployed on the
Cloud Layer, the tag will be generated as follows:
1cloud.myservice.1.1
2cloud.myservice.1.2
3cloud.myservice.1.3
4cloud.myservice.1.4
Considering one Service named MyService with the subservices 1 Master and 3
Workers deployed on the Cloud Layer, the tag will be generated as follows:
1cloud.myservice.1.master.1
2cloud.myservice.1.worker.1
3cloud.myservice.1.worker.2
4cloud.myservice.1.worker.3
Considering two Services named Client and Server composed by two hosts each
and deployed on the Cloud Layer, the tag will be generated as follows:
1cloud.client.1.1
2cloud.client.1.2
3cloud.server.2.1
4cloud.server.2.2
Note
You can find in scenario_dir/layers_services-validate.yaml file the Services tags
generated by E2Clab and their respective hosts. The layers_services-validate.yaml
file is generated after running one of the following commands:
e2clab layers-service scenario_dir/ artifacts_dir/ or
e2clab deploy scenario_dir/ artifacts_dir/.
How to deploy a Service?
In order to deploy you service, you have to:
define it in the
layers_services.yamlfile. TheMyService.pyfile name must be exactly the same (case sensitive) name of the service defined inlayers_services.yamlfile.place your
MyService.pyfile in e2clab/e2clab/services/ directory, so E2Clab can find it.
 1environment: ...
 2monitoring: ...
 3layers:
 4- name: cloud
 5  services:
 6  - name: MyService
 7    quantity: 4
 8    roles: [monitoring]
 9    # service metadata added by the user
10    data_1: value
11    data_2:
12      sub_data_1: value
13      sub_data_n: value
14    data_n: value
How can services access information from each other?
Next, we explain:
How to access services’ hosts in the
workflow.yamlfile.How to access information of the service itself.
How services access information from each other.
Accessing services’ hosts in the workflow.yaml file
Find below how to access services’ hosts in the workflow.yaml file from a
coarse-grained to a fine-grained selection (based on
Ansible patterns):
hosts: cloud.*all services’ hosts (multiple services) deployed in the Cloud layer.hosts: cloud.myservice.*all hosts that compose one or more MyService service(s).hosts: cloud.myservice.1.*all hosts (Master & Workers) that compose the MyService service.hosts: cloud.myservice.1.worker.*: all Worker hosts that compose the MyService service.hosts: cloud.myservice.1.worker.3: a single Worker host (3rd worker) in MyService service.
Accessing information of the service itself
Users may use _self. to access information of the service itself.
In the example below, we are accessing the container name {{ _self.container_name }}
and the workers {{ _self.workers }}. Remember that this extra information was
defined previously in the MyService.py service as follows:
extra_master = [{'container_name': "master", 'workers': workers}].
1- hosts: cloud.myservice.1.master.1
2  prepare:
3    - shell: docker exec -it -d {{ _self.container_name }}
4                          bash -c 'python example.py --workers {{ _self.workers }}'
Accessing information from another service(s)
Please, refer to Services Relationships to know how to define dependencies and relationships between services.