Provenance Capture: Edge-to-Cloud workflow
In this tutorial, we show how to capture provenance data of a toy application (e.g., AI model training) executed on the Edge-to-Cloud continuum (G5K and FIT IoT LAB testbeds) . The goal is to show how provenance data capture can help users to answer research questions like:
What are the model hyperparameters that obtained an accuracy value above 90%?
In this example you will learn how to:
Enable provenance data capture in E2Clab (Edge-to-Cloud: G5K and FIT IoT LAB testbeds)
Create a dataflow specification
Instrument the application code to decide what to capture
Query the database to answer the research questions
Experiment Artifacts
$ cd ~/git/
$ git clone https://gitlab.inria.fr/E2Clab/examples/provenance-tutorial
In this repository you will find:
the E2Clab configuration files such as layers_services.yaml, network.yaml, and workflow.yaml.
the my-dataflow-specification.py and the toy application user-application.py.
Defining the Experimental Environment
Layers & Services Configuration
This configuration file presents the layers and services that compose this example.
The Master (one machine quantity: 1 in Grid’5000 environment: g5k).
The Worker (one A8-M3 device quantity: 1 in FIT IoT LAB environment: iotlab).
To enable the E2Clab provenance service, we add the provenance: attribute with the
following configuration:
provider: g5kto deploy in a G5K machine in the gros clustercluster: gros.dataflow_spec: my-dataflow-specification.pyto define the attributes and value types of the dataflow to create the provenance database tables. This file must be in theartifacts_dirdirectory you defined in theE2Clab command line.ipv: 6to allow FIT IoT LAB device to use its IPv6 network to send dataparallelism: 2to parallelize the provenance data translator (translates from ProvLight to DfAnalyzer data format) and the broker topic.
Finally, we add roles: ['provenance'] in the Master and Worker services to
enable data capture on them (e.g., install ProvLight capture library and set up environment
variables to enable the connection with the provenance service).
 1---
 2environment:
 3  job_name: provenance-tutorial
 4  walltime: "00:59:00"
 5  g5k:
 6    cluster: gros
 7    job_type: ["deploy"]
 8    env_name: "debian11-x64-big"
 9    firewall_rules:
10      - services: ["provenance_service"]
11        ports: [1883]
12  iotlab:
13    cluster: grenoble
14provenance:
15  provider: g5k
16  cluster: gros
17  dataflow_spec: my-dataflow-specification.py
18  ipv: 6
19  parallelism: 2
20layers:
21- name: cloud
22  services:
23  - name: Master
24    environment: g5k
25    cluster: gros
26    quantity: 1
27    roles: ['provenance']
28- name: edge
29  services:
30  - name: Worker
31    environment: iotlab
32    cluster: grenoble
33    archi: a8:at86rf231
34    quantity: 1
35    roles: ['provenance']
Note
We create a firewall rule on Grid’5000 to allow the Worker (FIT IoT LAB device) to
send the captured data to the E2Clab provenance service deployed on G5K on
port 1883 (MQTT protocol).
The toy application
To emulate the model training with various hyperparameters we implement the application below. The model input are the hyperparameters and the training output is the model performance such as the accuracy and the training time.
 1import time, random
 2
 3def model_training(training_time):
 4    time.sleep(training_time)
 5    accuracy = round(random.uniform(0, 1), 2)
 6    return training_time, accuracy
 7
 8
 9if __name__ == "__main__":
10    dataflow_id = "model_training"
11    transformation_id = "training"
12    training_input = "training_input"
13    training_output = "training_output"
14
15    # training 10x with different hyperparameters
16    for training_id in range(1, 10):
17        # model hyperparameters
18        kernel_size = random.randint(1, 10)
19        num_kernels = random.randint(8, 16)
20        length_of_strides = random.randint(1, 5)
21        pooling_size = random.randint(8, 16)
22        # training input: model hyperparameters
23        model_hyperparameters = {'model_hyperparameters': [
24            kernel_size,
25            num_kernels,
26            length_of_strides,
27            pooling_size,
28        ]}
29        # START training... time to train the model with hyperparameter set
30        _training_time, _accuracy = model_training(training_time=random.randint(1, 5))
31        # training output: model performance
32        print(f"hyperparameters = {model_hyperparameters['model_hyperparameters']} | "
33              f"accuracy = {_accuracy} / training_time = {_training_time}")
Network Configuration
The file below presents the network configuration between the cloud and edge
infrastructures delay: 28ms, loss: 0.1%, rate: 1gbit.
1networks:
2- src: cloud
3  dst: edge
4  delay: "28ms"
5  rate: "1gbit"
6  loss: 0.1
Workflow Configuration
This configuration file presents the application workflow configuration.
The Master
cloud.*and the Workeredge.*:
prepare copies from the local machine to the remote machine the application.
launch executes the application.
 1- hosts: cloud.*
 2  prepare:
 3    - copy:
 4        src: "{{ working_dir }}/user-application.py"
 5        dest: "/tmp/user-application.py"
 6  launch:
 7    - shell: python /tmp/user-application.py
 8      async: 120
 9      poll: 0
10- hosts: edge.*
11  prepare:
12    - copy:
13        src: "{{ working_dir }}/user-application.py"
14        dest: "/tmp/user-application.py"
15  launch:
16    - shell: source ~/.bashrc && python /tmp/user-application.py
User-Defined Provenance Data Capture
Next, we show how we used the ProvLight client library to instrument the application code
to capture the model hyperparameters and the model performance results. The Workflow,
Task, and Data classes are used to capture data.
 1import time, random, os
 2from provlight.workflow import Workflow
 3from provlight.task import Task
 4from provlight.data import Data
 5
 6client_id = os.environ.get('PROVLIGHT_SERVER_TOPIC', "")
 7
 8def model_training(training_time):
 9    time.sleep(training_time)
10    accuracy = round(random.uniform(0, 1), 2)
11    return training_time, accuracy
12
13
14if __name__ == "__main__":
15    # IDs defined in the dataflow specification
16    dataflow_id = "model_training"
17    transformation_id = "training"
18    training_input = "training_input"
19    training_output = "training_output"
20
21    wf = Workflow(dataflow_id)
22    wf.begin()
23
24    # training 10x with different hyperparameters
25    for training_id in range(1, 10):
26        # model hyperparameters
27        kernel_size = random.randint(1, 10)
28        num_kernels = random.randint(8, 16)
29        length_of_strides = random.randint(1, 5)
30        pooling_size = random.randint(8, 16)
31        # training input: model hyperparameters
32        model_hyperparameters = {'model_hyperparameters': [
33            kernel_size,
34            num_kernels,
35            length_of_strides,
36            pooling_size,
37        ]}
38        task = Task(int(str(client_id)+str(training_id)), wf, transformation_id, dependencies=[])
39        data_in = Data(training_input, dataflow_id, [], model_hyperparameters)
40        task.begin([data_in])
41        # START training... time to train the model with hyperparameter set
42        _training_time, _accuracy = model_training(training_time=random.randint(1, 5))
43        # training output: model performance
44        data_out = Data(training_output, dataflow_id, [], {'model_performance': [
45            _accuracy,
46            _training_time,
47        ]})
48        task.end([data_out])
49
50    wf.end()
Running & Verifying Experiment Execution
Find below the commands to deploy this application and check its execution.
$ e2clab layers-services ~/git/provenance-tutorial/ ~/git/provenance-tutorial/artifacts/
The Provenance Service GUI is available at:
ssh -NL 22000:localhost:22000 gros-86.nancy.grid5000.fr
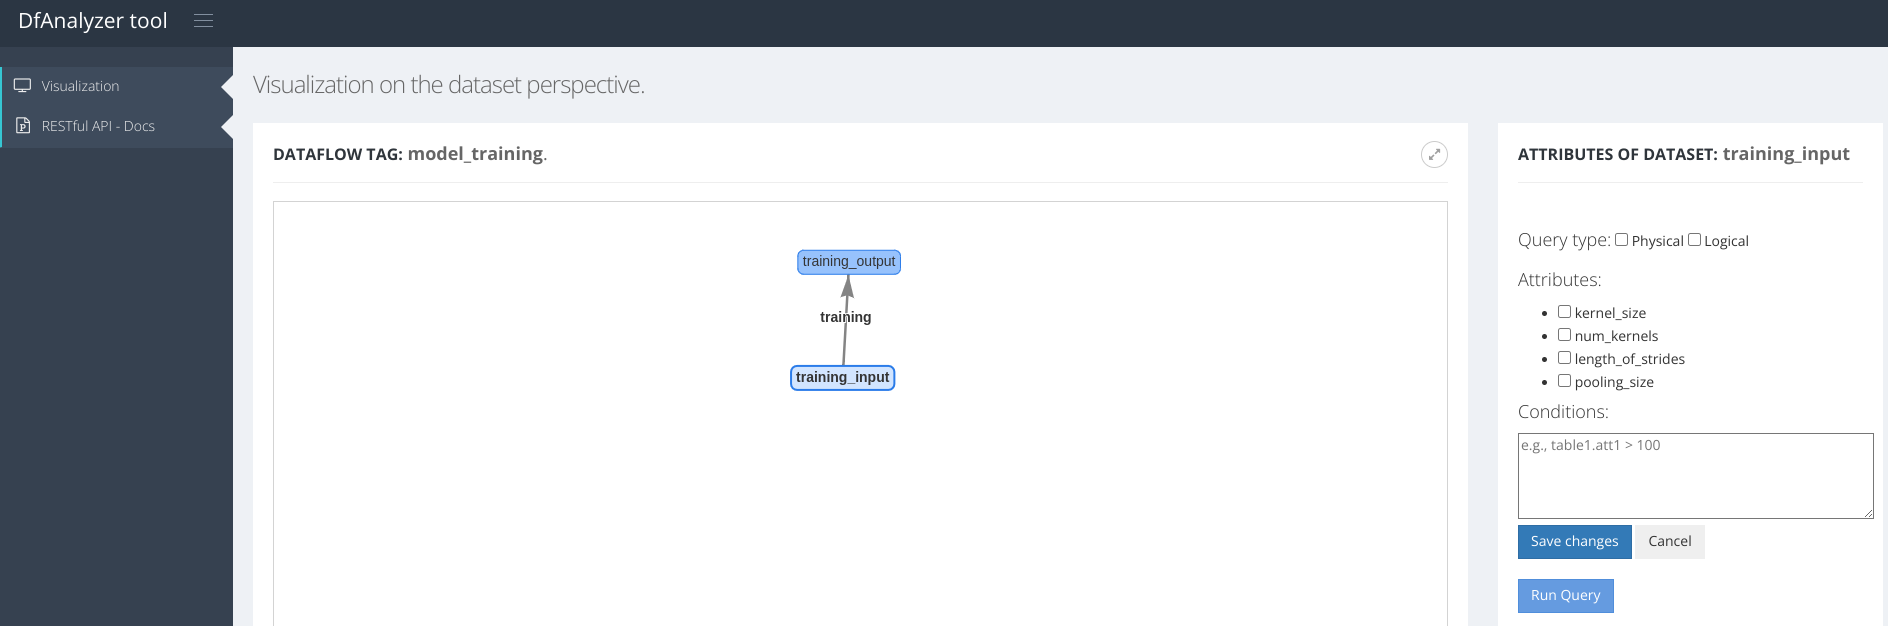
Figure 1: Provenance Service GUI (DfAnalyzer)
$ e2clab workflow ~/git/provenance-tutorial/ prepare
$ e2clab workflow ~/git/provenance-tutorial/ launch
Deployment Validation & Experiment Results
We can access the database as follows:
$ ssh root@gros-86.nancy.grid5000.fr
$ docker exec -it dfanalyzer bash
$ monetdb status
$ mclient dataflow_analyzer
With \d you can list all tables.
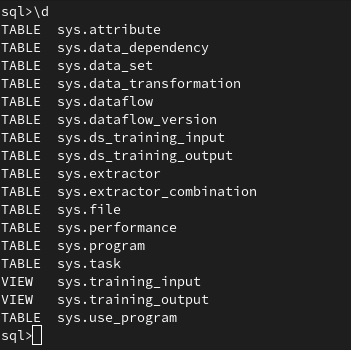
Figure 2: Tables in the provenance database
After model training on G5K node and FIT IoT LAB device, we can visualize the training results as presented in Figure 3: Model input (hyperparameters) and Figure 4: Model output (accuracy and training time).
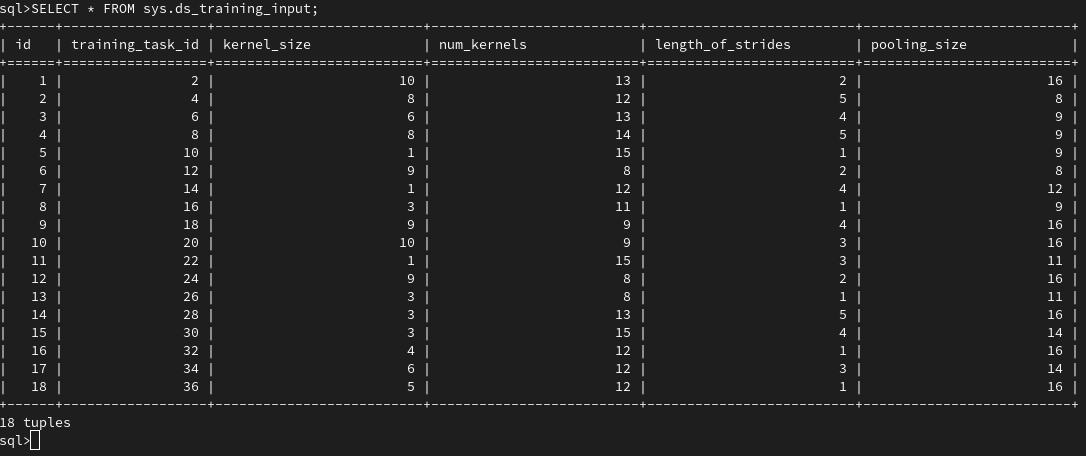
Figure 3: Model input (hyperparameters)
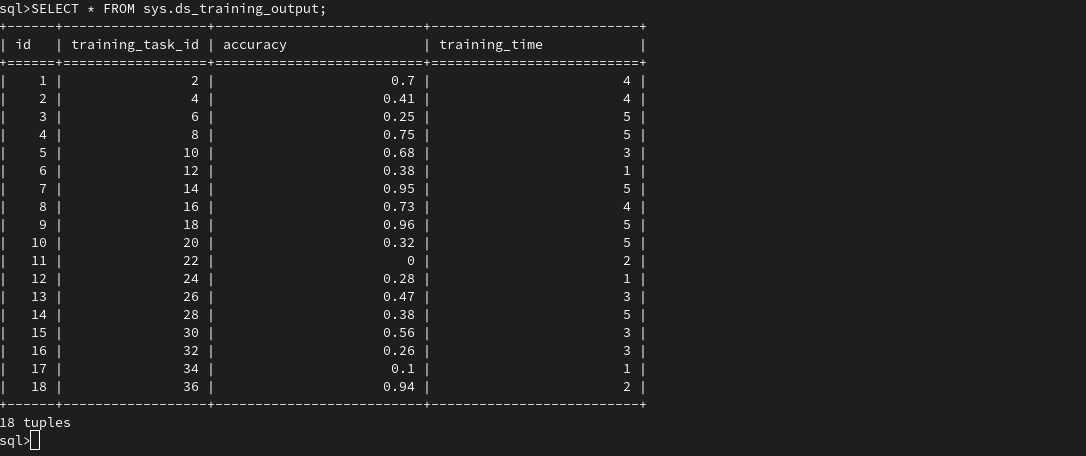
Figure 4: Model output (accuracy and training time)
After multiple model evaluations, thanks to provenance data capture during model training, users can easily answer the following research question:
What are the model hyperparameters that obtained an accuracy value above 90%?

Figure 5: What are the model hyperparameters that obtained an accuracy value above 90%?
Saving the Experiment Results
$ e2clab finalize ~/git/provenance-tutorial/
The experiment results will be saved at:
$ ls ~/provenance-tutorial/20231120-102842/
$ layers_services-validate.yaml
$ provenance-data/                  # contains the 'provenance_database.sql' file.
$ workflow-validate.out