Running COMPSs Applications on G5K (Docker deployment)
This section is intended to show how to execute COMPSs applications on Grid’5000. This example uses the official Docker image of COMPSs. This image comes with COMPSs installed and ready to use.
In this example you will learn how to (see Figure 1: COMPSs deployment):
- Define the experimental environment:
Layers and Services + Monitoring + Define the logic of your COMPSs Service;
Network constraints;
Workflow (tasks: prepare, launch, and finalize).
Deploy a Docker COMPSs Cluster: 1 Master + 3 Workers
Run COMPSs applications
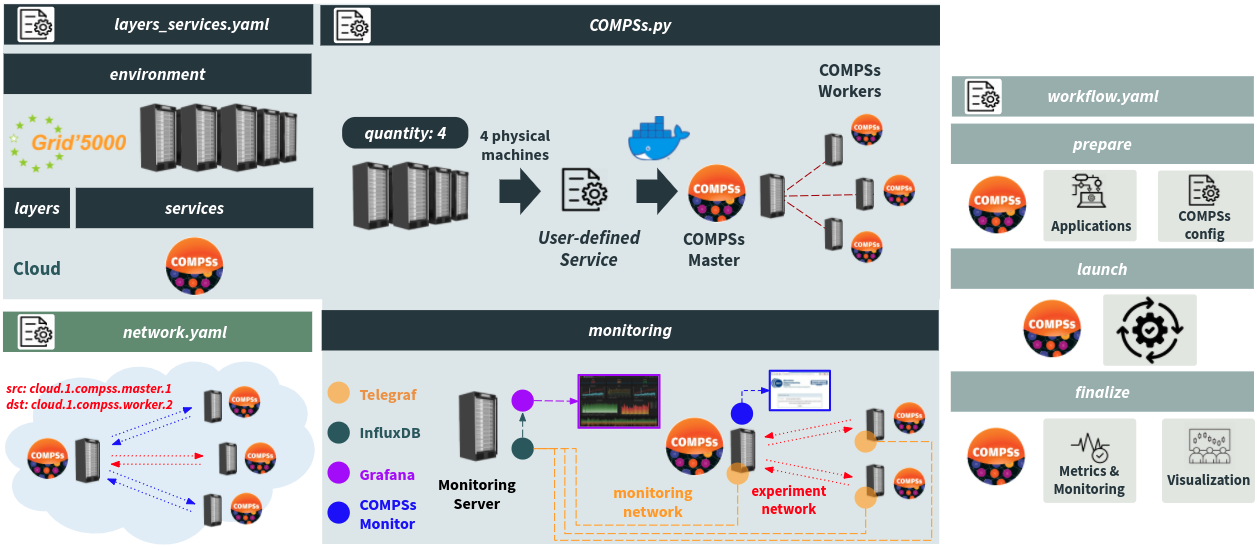
Figure 1: COMPSs deployment
Experiment Artifacts
$ git clone https://gitlab.inria.fr/E2Clab/examples/compss
$ cd compss/
$ ls
artifacts     # Python scripts to generate the COMPSs configuration files (resources.xml and project.xml)
docker        # contains the COMPSs.py Service and layers_services.yaml, network.yaml, and workflow.yaml files
Defining the Experimental Environment
Layers & Services Configuration
This configuration file presents the Layers and Services that compose this example. The COMPSs Service (a
cluster of four nodes, quantity: 4) is composed of one Master and three Workers (please, see the COMPSs.py
Service). The name of the COMPSs Service - name: COMPSs must be the same as the COMPSs.py file.
Note that we also added a TIG (Telegraf, InfluxDB, and Grafana) Monitoring stack monitoring. Adding roles: [monitoring]
in the COMPSs Service we request monitoring of all machines.
 1environment:
 2  job_name: compss
 3  walltime: "00:59:00"
 4  g5k:
 5    job_type: ["deploy"]
 6    env_name: "debian11-x64-big"
 7    cluster: nova
 8monitoring:
 9  type: tig
10  network: shared
11layers:
12- name: cloud
13  services:
14  - name: COMPSs
15    quantity: 4
16    roles: [monitoring]
Defining the logic of your COMPSs Service
- Next, we define the logic of our COMPSs Service. It consists mainly in:
installing Docker and pulling the official image of COMPSs;
assigning machines for the Master and Workers;
creating an overlay network for standalone containers;
adding information about the Workers to the Master (see
extra=extra_compss_masterin COMPSs.py) to generate the resources.xml and project.xml files;registering the Master and Worker as a subservice of the COMPSs Service.
Please, read the comments in the code for more details.
 1from e2clab.services import Service
 2from enoslib.api import populate_keys
 3from enoslib.objects import Roles
 4import enoslib as en
 5
 6
 7class COMPSs(Service):
 8    def deploy(self):
 9        # ssh keys for the root users must be generated and pushed to all nodes
10        populate_keys(Roles({"compss": self.hosts}), ".", "id_rsa")
11
12        # install docker
13        registry_opts = dict(type="external", ip="docker-cache.grid5000.fr", port=80)
14        self.deploy_docker(registry_opts=registry_opts)
15
16        # Assign machines to COMPSs Master and Workers
17        compss_master = "compss_master"
18        compss_worker = "compss_worker"
19        roles_compss_master = Roles({compss_master: [self.hosts[0]]})
20        roles_compss_worker = Roles({compss_worker: self.hosts[1:len(self.hosts)]})
21
22        # Create an overlay network for standalone containers
23        # https://docs.docker.com/network/network-tutorial-overlay/#use-an-overlay-network-for-standalone-containers
24        overlay_network = "compss-net"
25        en.run("docker swarm leave --force", roles=self.hosts, on_error_continue=True)
26        cmd_swarm_init = str(en.run("docker swarm init | awk '/docker swarm join --token/'", roles=roles_compss_master)[0].stdout).lstrip()
27        en.run(f"{cmd_swarm_init}", roles=roles_compss_worker)
28        en.run(f"docker network create --driver=overlay --attachable {overlay_network}", roles=roles_compss_master)
29
30        # Start COMPSs Master container
31        with en.actions(roles=roles_compss_master) as a:
32            a.docker_container(
33                name=compss_master,
34                image="compss/compss",
35                volumes="/root/.ssh:/root/.ssh",
36                restart="yes",
37                restart_policy="always",
38                network_mode=overlay_network,
39                interactive="yes",
40                tty="yes",
41                privileged="yes",
42                default_host_ip="",
43            )
44
45        # Start COMPSs Worker containers
46        workers = []
47        extra_compss_worker = []
48        for host in roles_compss_worker[compss_worker]:
49            worker_id = f'{compss_worker}_{host.alias}'
50            workers.append(worker_id)
51            extra_compss_worker.append({'container_name': worker_id})
52            with en.actions(roles=host) as a:
53                a.docker_container(
54                    name=worker_id,
55                    image="compss/compss",
56                    volumes="/root/.ssh:/root/.ssh",
57                    restart="yes",
58                    restart_policy="always",
59                    network_mode=overlay_network,
60                    interactive="yes",
61                    tty="yes",
62                    privileged="yes",
63                    published_ports="43001-43002:43001-43002",
64                    default_host_ip="",
65                )
66
67        # Users may add extra information to Services/sub-Services to access them in "workflow.yaml".
68        # e.g, to access the container name as {{ _self.container_name }} in "workflow.yaml", you can do as follows:
69        extra_compss_master = [{'container_name': compss_master, 'workers': ','.join(workers)}]  # COMPSs Master
70
71        # Register the Service
72        # register COMPSs Master Service
73        self.register_service(_roles=roles_compss_master, sub_service="master", extra=extra_compss_master)
74        # register COMPSs Worker Service
75        self.register_service(_roles=roles_compss_worker, sub_service="worker", extra=extra_compss_worker)
76
77        return self.service_extra_info, self.service_roles
Network Configuration
The file below presents the network configuration between machines in the COMPSs cluster. In this example, we defined a constraint between the Master and all Workers.
1networks:
2- src: cloud.compss.1.master.1
3  dst: cloud.compss.1.worker.*
4  delay: "2ms"
5  rate: "10gbit"
6  loss: 0.1
Workflow Configuration
This configuration file presents the application workflow configuration, they are:
- Regarding just the COMPSs Master
cloud.compss.*.master.*: in
preparewe are copying the Python scripts to genetrate the COMPSs configuration files and then we generate such files (resources.xmlandproject.xml). Note that we used--workers {{ _self.workers }}since we added this information in the COMPSs.py Service. Finally, we copy both files to the container.in
launchwe run the COMPSs application.
- Regarding just the COMPSs Master
Regarding all Workers in the COMPSs cluster
cloud.compss.*.worker.*, inpreparewe add the COMPSs applications.
 1- hosts: cloud.compss.*.master.*
 2  prepare:
 3    - debug:
 4        msg: "[{{ lookup('pipe','date +%Y-%m-%d-%H-%M-%S') }}] Adding applications to the COMPSs Master. My workers are: {{ _self.workers }}"
 5    - copy:
 6        src: "{{ working_dir }}/generate_project_xml_file.py"
 7        dest: "/tmp/generate_project_xml_file.py"
 8    - copy:
 9        src: "{{ working_dir }}/generate_resources_xml_file.py"
10        dest: "/tmp/generate_resources_xml_file.py"
11    - shell: docker exec -it -d {{ _self.container_name }} bash -c 'cd /root/ && git clone https://github.com/bsc-wdc/tutorial_apps.git'
12    - shell: cd /tmp/ && python generate_project_xml_file.py --workers {{ _self.workers }} --install_dir /opt/COMPSs/ --working_dir /tmp/COMPSsWorker --user root --app_dir /root/ --path_to_new_file /tmp/default_project.xml
13    - shell: cd /tmp/ && python generate_resources_xml_file.py --workers {{ _self.workers }} --computing_units 24 --memory_size 125 --min_port_nio 43001 --max_port_nio 43002 --path_to_new_file /tmp/default_resources.xml
14    - shell: docker cp /tmp/default_project.xml {{ _self.container_name }}:/opt/COMPSs/Runtime/configuration/xml/projects/default_project.xml
15    - shell: docker cp /tmp/default_resources.xml {{ _self.container_name }}:/opt/COMPSs/Runtime/configuration/xml/resources/default_resources.xml
16  launch:
17    - debug:
18        msg: "Running COMPSs application: simple.py"
19    - shell: docker exec -it {{ _self.container_name }} bash -c '/opt/COMPSs/Runtime/scripts/user/runcompss --project="/opt/COMPSs/Runtime/configuration/xml/projects/default_project.xml" --resources="/opt/COMPSs/Runtime/configuration/xml/resources/default_resources.xml" -d /root/tutorial_apps/python/simple/src/simple.py 2 2>&1'
20- hosts: cloud.compss.*.worker.*
21  prepare:
22    - debug:
23        msg: "[{{ lookup('pipe','date +%Y-%m-%d-%H-%M-%S') }}] Adding applications to the COMPSs Workers"
24    - shell: docker exec -it -d {{ _self.container_name }} bash -c 'cd /root/ && git clone https://github.com/bsc-wdc/tutorial_apps.git'
Note
Besides prepare and launch, you could also use finalize to backup some data (e.g., experiment results).
E2Clab first runs on all machines the prepare tasks. Then, the launch tasks on all machines, and finally the
finalize tasks. Regarding the hosts order, it is top to down as defined by the users in the workflow.yaml
file.
Running & Verifying Experiment Execution
Find below the command to deploy the COMPSs cluster on G5K and run COMPSs applications.
Before starting:
make sure that your COMPSs.py file is located in:
e2clab/e2clab/services/.in the command bellow,
compss/docker/is the scenario directory (where the fileslayers_services.yaml,network.yaml, andworkflow.yamlmust be placed and where the results will be saved).in the command bellow,
compss/artifacts/is the artifacts directory (where the Python scripts to generate the COMPSs configuration files must be placed).
$ e2clab deploy compss/docker/ compss/artifacts/
During application runtime, you may want to access the Grafana Web interface to visualize the moniotring data of all
machines that compose the COMPSs cluster (please, check the compss/docker/layers_services-validate.yaml file to
get the instructions to access Grafana).
After the application execution, you can check the log files as follows:
$ docker exec -it compss_master bash
$ cat /root/.COMPSs/simple.py_01/runtime.log
$ cat /root/.COMPSs/simple.py_01/jobs/job1_NEW.out
Deployment Validation & Experiment Results
Find below the files generated after the execution of the experiment. It consists of validation files
(layers_services-validate.yaml, workflow-validate.out, and network-validate/) and monitoring data
influxdb-data.tar.gz.
$ ls compss/docker/20220325-152207/

layers_services-validate.yaml   # Mapping between layers and services with physical machines
workflow-validate.out           # Commands used to deploy the application (prepare, launch, and finalize)
network-validate/               # Network configuration for each physical machine
influxdb-data.tar.gz            # Monitoring data
Note
Providing a systematic methodology to define the experimental environment and providing access to the methodology artifacts (layers_services.yaml, network.yaml, workflow.yaml, and the COMPSs.py Service) leverages the experiment Repeatability, Replicability, and Reproducibility, see ACM Digital Library Terminology.