Provenance Data Capture
The process of understanding, optimizing, and reproducing complex Edge-to-Cloud workflows may be assisted by provenance data capture. Provenance data refer to a record trail that accounts for the origin of a piece of data together with descriptions of the computational processes that assist in explaining how and why it was generated. Capturing provenance data during workflow execution helps users in tracking inputs, outputs, and processing history, allowing them to steer workflows precisely.
ProvLight
ProvLight is an open-source tool that allows researchers to efficiently capture provenance data of workflows running on IoT/Edge infrastructures. ProvLight presents low capture overhead in terms of: capture time; CPU and memory usage; network usage; and power consumption.
Architecture
The architecture of ProvLight is presented in Figure 1: ProvLight architecture. It follows a client/server model:
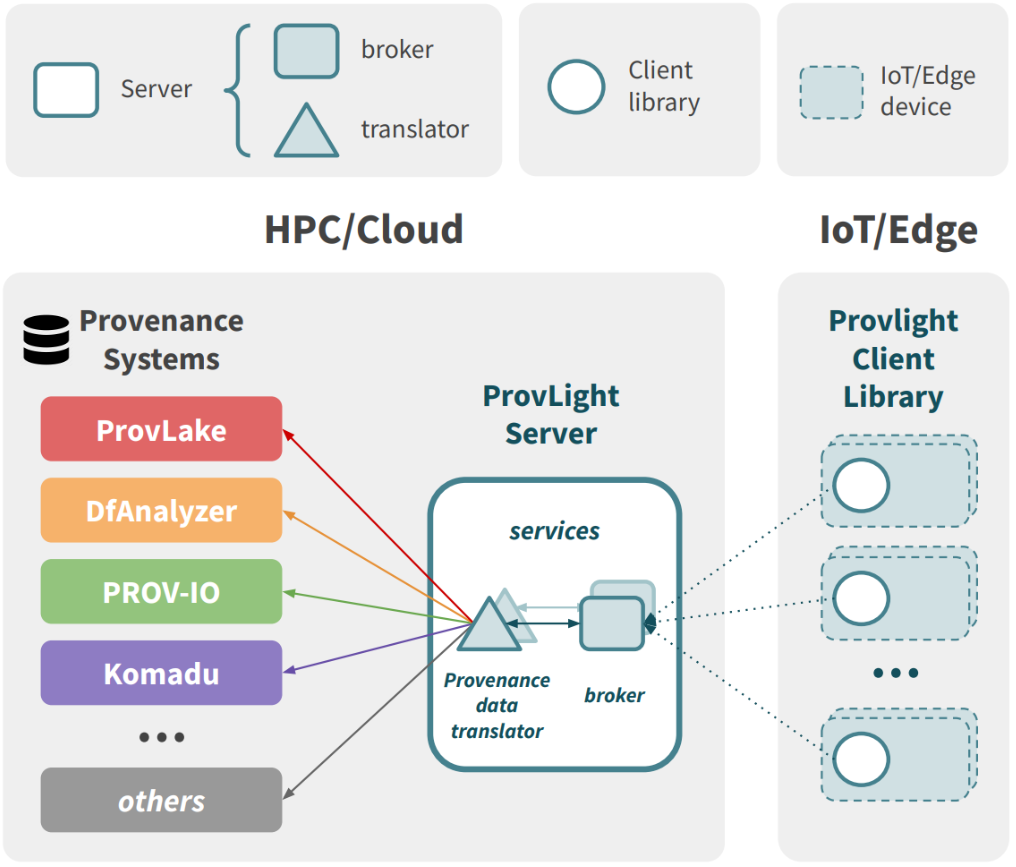
Figure 1: ProvLight architecture
Server: the ProvLight server is composed of a broker and a provenance data translator (MQTT-SN client lib).
(i) Broker: refers to an MQTT-SN broker (MQTT for Sensor Networks). During workflow execution, clients subscribe to the broker and then start to transmit the captured data. Next, this data is forwarded to the provenance data translator, which is subscribed to the broker.
(ii) Provenance Data Translator: translates the captured data to the respective format used by the provenance system. The provenance data translator may be extended, by users, to translate to a particular data model of a provenance system (compatible with W3C PROV-DM). After translating, it sends the data to the provenance system service to store the captured data.
Client: the ProvLight client aims to efficiently capture provenance data on resource-limited devices. ProvLight provides a client library that follows the W3C PROV-DM provenance model. This library allows users to instrument their workflow code to decide what data to capture. A client is configured to transmit, at runtime, the captured data to the remote broker. This allows users to track workflow execution at runtime (e.g., started and finished tasks, input and output data, etc.) through provenance systems supporting data ingestion at runtime.
Data exchange model
Figure 2: ProvLight provenance data exchange model follows the W3C PROV-DM recommendation. The goal is to have a data exchange specification (domain-agnostic PROV modeling) for capturing data in the IoT/Edge and making sure these captured data are compatible with W3C PROV-based workflow provenance systems, such as ProvLake, DfAnalyzer, PROV-IO, among many others.
Figure 2 presents ProvLight classes (right side) and their relationships and maps them to PROV-DM core elements. The main classes of our model are Workflow, Task, and Data. These classes are derived from the Agent, Activity, and Entity PROV-DM types, respectively. ProvLight classes aim to provide a simplified abstraction allowing users to track workflow (Workflow class), input and output parameters (Data class), and processing history (Task class).
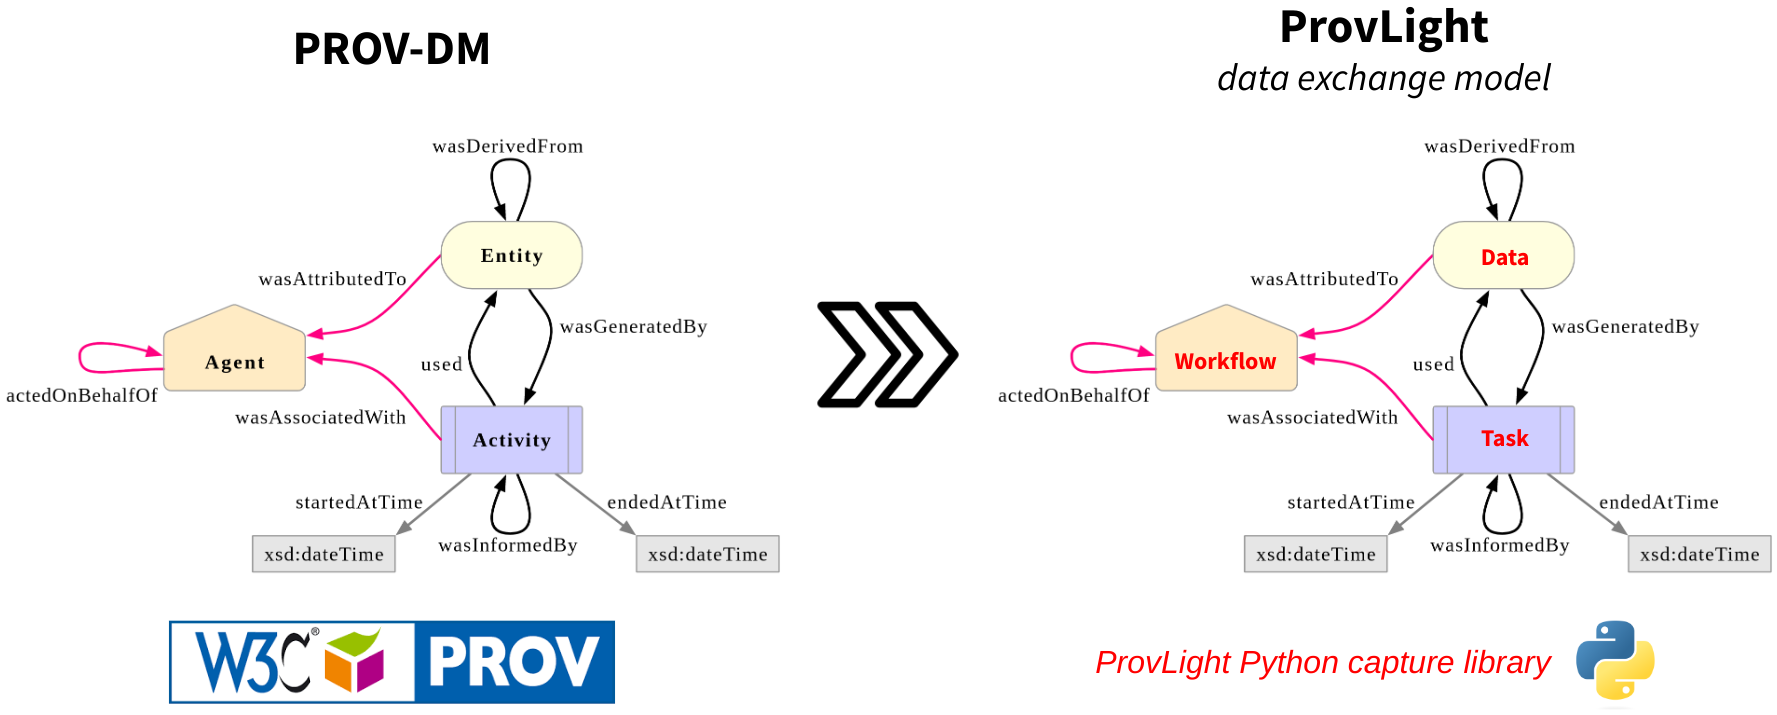
Figure 2: ProvLight provenance data exchange model follows the W3C PROV-DM recommendation
The Workflow class may be used to refer to the application workflow (e.g., Federated Learning training).
The Task class refers to the tasks executed in the workflow (e.g., each epoch or model update of the model training).
The Data class represents the input data attributes and values (e.g., hyperparameters of the learning algorithm) or the output attributes (e.g., training time and accuracy).
These classes are implemented in the ProvLight Python capture library.
Capture library
The design choices of the ProvLight client library provides a series of features targeting resource-limited IoT/Edge devices:
Simplified data models: simplified classes for provenance modeling that allow users to represent workflows, data derivations (e.g., input/output data from tasks) and tasks (e.g., status, dependencies, data derivations)
Data compression & grouping: compresses the bytes in captured data before transmitting over the network; and allow users to optionally group data just from ended tasks, so users may still track at workflow runtime the tasks that have already started.
Lightweight transmission protocol: such as MQTT for Sensor Networks.
Asynchronous communication model: MQTT-SN QoS level 2 (exactly once)
The provenance manager (ProvLight into E2Clab)
The integration of ProvLight into E2Clab allows users to capture end-to-end provenance data of Edge-to-Cloud workflows. Figure 3: ProvLight into E2Clab shows the extended E2Clab architecture with the new components in the red color (the Provenance Manager).
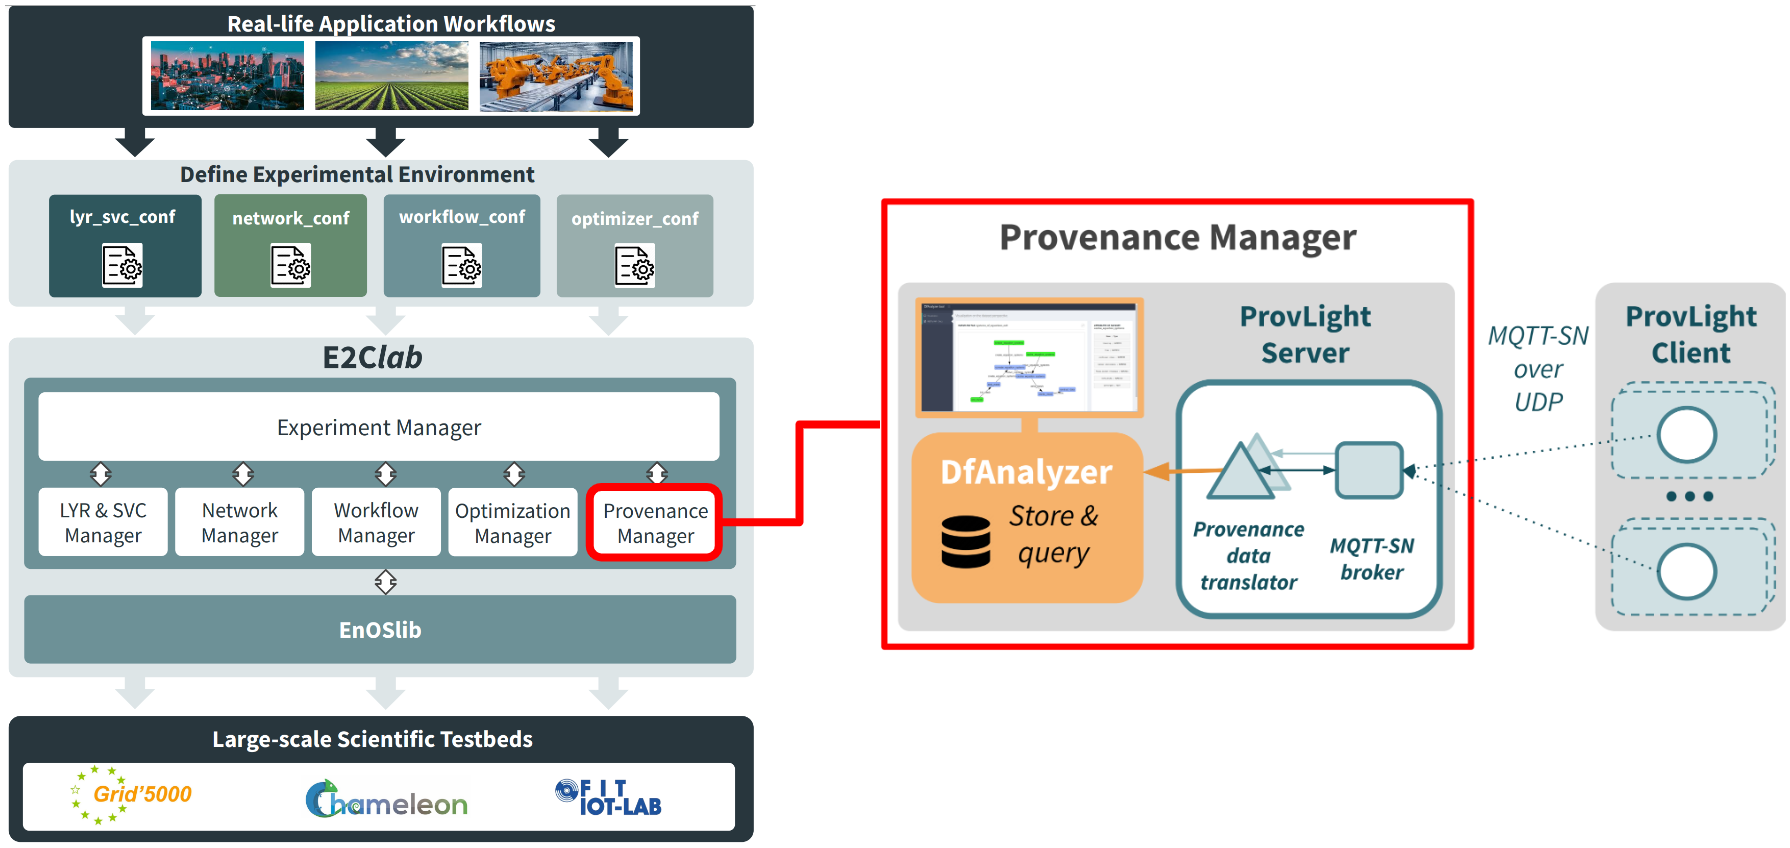
Figure 3: ProvLight into E2Clab
The Provenance Manager is composed of:
ProvLight: to efficiently capture provenance data of workflows running on IoT devices. It also allows users to capture provenance in Cloud/HPC environments. ProvLight translates the captured data to the DfAnalyzer data model.
DfAnalyzer: to
storeandqueryprovenance captured by ProvLight during workflow runtime (e.g., compare provenance of multiple workflow evaluations to understand how they impact on performance). Furthermore, it allows users tovisualizedataflow specifications (i.e., data attributes of each dataset). DfAnalyzer is available as open-source software.
How to capture provenance data?
To enable provenance data capture in E2Clab, users must (1) define the dataflow specification, (2) instrument their application code, and configure the (3) layers_services.yaml file.
(1) Defining the dataflow specification: next we illustrate how users can define their dataflow specification using DfAnalyzer as a provenance system to store the data. In this example the Dataflow refers to the
model_trainingthe Transformation refers to thetrainingof a model. For eachtrainingwe have the input and output data:input: Set refers to the
training_inputsuch as the hyperparameters (kernel_size,num_kernels,length_of_strides, andpooling_size).output: Set refers to the
training_outputsuch asaccuracyandtraining_time.
 1from dfa_lib_python.dataflow import Dataflow
 2from dfa_lib_python.transformation import Transformation
 3from dfa_lib_python.attribute import Attribute
 4from dfa_lib_python.attribute_type import AttributeType
 5from dfa_lib_python.set import Set
 6from dfa_lib_python.set_type import SetType
 7
 8
 9if __name__ == "__main__":
10    df = Dataflow("model_training")
11    # Transformation model training
12    tf1 = Transformation("training")
13    tf1_input = Set("training_input", SetType.INPUT,
14                    [Attribute("kernel_size", AttributeType.NUMERIC),
15                     Attribute("num_kernels", AttributeType.NUMERIC),
16                     Attribute("length_of_strides", AttributeType.NUMERIC),
17                     Attribute("pooling_size", AttributeType.NUMERIC),
18                     ])
19    tf1_output = Set("training_output", SetType.OUTPUT,
20                     [Attribute("accuracy", AttributeType.NUMERIC),
21                      Attribute("training_time", AttributeType.NUMERIC)])
22    tf1.set_sets([tf1_input, tf1_output])
23    df.add_transformation(tf1)
24    df.save()
(2) Instrumenting the application code: based on the dataflow specification, next we show how users can instrument their application code using the Workflow, Task, and Data classes. Note that users can easily instrument their code to decide what to capture. In this example the user wants to capture the model hyperparameters and the respective model performance (e.g., accuracy and training time).
 1import time, random, os
 2from provlight.workflow import Workflow
 3from provlight.task import Task
 4from provlight.data import Data
 5
 6client_id = os.environ.get('PROVLIGHT_SERVER_TOPIC', "")
 7
 8def model_training(training_time):
 9    time.sleep(training_time)
10    accuracy = round(random.uniform(0, 1), 2)
11    return training_time, accuracy
12
13
14if __name__ == "__main__":
15    # IDs defined in the dataflow specification
16    dataflow_id = "model_training"
17    transformation_id = "training"
18    training_input = "training_input"
19    training_output = "training_output"
20
21    wf = Workflow(dataflow_id)
22    wf.begin()
23
24    # training 10x with different hyperparameters
25    for training_id in range(1, 10):
26        # model hyperparameters
27        kernel_size = random.randint(1, 10)
28        num_kernels = random.randint(8, 16)
29        length_of_strides = random.randint(1, 5)
30        pooling_size = random.randint(8, 16)
31        # training input: model hyperparameters
32        model_hyperparameters = {'model_hyperparameters': [
33            kernel_size,
34            num_kernels,
35            length_of_strides,
36            pooling_size,
37        ]}
38        task = Task(int(str(client_id)+str(training_id)), wf, transformation_id, dependencies=[])
39        data_in = Data(training_input, dataflow_id, [], model_hyperparameters)
40        task.begin([data_in])
41        # START training... time to train the model with hyperparameter set
42        _training_time, _accuracy = model_training(training_time=random.randint(1, 5))
43        # training output: model performance
44        data_out = Data(training_output, dataflow_id, [], {'model_performance': [
45            _accuracy,
46            _training_time,
47        ]})
48        task.end([data_out])
49
50    wf.end()
(3) Configuring layers_services.yaml: next, we show how to enable provenance data capture in E2Clab.
1provenance:
2  provider: g5k  # testbed to deploy the provenance service.
3  cluster: gros  # machine where the provenance service will be running.
4  dataflow_spec: my-dataflow-specification.py  # user-defined dataflow specification.
5  ipv: 6  # optional (default is IPv4): enables IPv6 network to transmit provenance data.
6  parallelism: 2  # optional (default is no parallelism): parallelize the provenance data translator (ProvLight Service) and broker topic.
Note
E2Clab will look for the dataflow specification file in the artifacts_dir you
used in the E2Clab command line.
Try some examples
We provide a toy example here.